netty在服务端端口绑定和新连接建立的过程中会建立相应的channel,而与channel的动作密切相关的是pipeline这个概念,pipeline像是可以看作是一条流水线,原始的原料(字节流)进来,经过加工,最后输出,在前面的文章《Netty服务端启动流程分析》 中已经讲到在创建实例化channel的时候,会初始化它的各种属性,其中就包括pipline,因此这篇文章将从pipline初始化为入口点来分析pipline的运作流程。
AbstractChannel.java
1 2 3 4 5 6 7 8 9 10 11 12 protected AbstractChannel (Channel parent) this .parent = parent; id = newId(); unsafe = newUnsafe(); pipeline = newChannelPipeline(); }
通过调用newChannelPipline()函数,来创建pipline
1 2 3 4 5 6 protected DefaultChannelPipeline newChannelPipeline () return new DefaultChannelPipeline(this ); }
我们来看下DefaultChannelPipeline的构造函数:
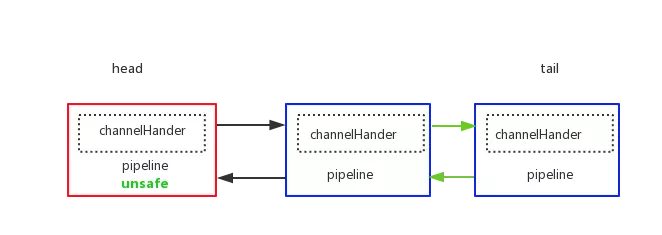
1
2
3
4
5
6
7
8
9
10
11
12
protected DefaultChannelPipeline (Channel channel) this .channel = ObjectUtil.checkNotNull(channel, "channel" ); succeededFuture = new SucceededChannelFuture(channel, null ); voidPromise = new VoidChannelPromise(channel, true ); tail = new TailContext(this ); head = new HeadContext(this ); head.next = tail; tail.prev = head; }
因此最开始的pipline的结构如下所示
pipline添加节点 1 2 3 4 5 6 7 8 9 10 11 12 13 14 15 16 17 18 19 20 21 22 23 24 25 26 27 28 29 30 31 32 33 34 35 36 37 @Override public final ChannelPipeline addLast (EventExecutorGroup group, String name, ChannelHandler handler) final AbstractChannelHandlerContext newCtx; synchronized (this ) { checkMultiplicity(handler); newCtx = newContext(group, filterName(name, handler), handler); addLast0(newCtx); if (!registered) { newCtx.setAddPending(); callHandlerCallbackLater(newCtx, true ); return this ; } EventExecutor executor = newCtx.executor(); if (!executor.inEventLoop()) { newCtx.setAddPending(); executor.execute(new Runnable() { @Override public void run () callHandlerAdded0(newCtx); } }); return this ; } } callHandlerAdded0(newCtx); return this ; }
检查是否有重复的handler 在用户代码添加一条handler的时候,首先会查看该handler有没有添加过
1
2
3
4
5
6
7
8
9
10
11
private static void checkMultiplicity (ChannelHandler handler) if (handler instanceof ChannelHandlerAdapter) { ChannelHandlerAdapter h = (ChannelHandlerAdapter) handler; if (!h.isSharable() && h.added) { throw new ChannelPipelineException( h.getClass().getName() + " is not a @Sharable handler, so can't be added or removed multiple times." ); } h.added = true ; } }
netty使用一个成员变量added标识一个channel是否已经添加,上面这段代码很简单,如果当前要添加的Handler是非共享的,并且已经添加过,那就抛出异常,否则,标识该handler已经添加
由此可见,一个Handler如果是sharable的,就可以无限次被添加到pipeline中,我们客户端代码如果要让一个Handler被共用,只需要加一个@Sharable标注即可,如下
1
2
3
4
@Sharable public class BusinessHandler }
而如果Handler是sharable的,一般就通过spring的注入的方式使用,不需要每次都new 一个
isSharable() 方法正是通过该Handler对应的类是否标注@Sharable来实现的
ChannelHandlerAdapter#isSharable()
1 2 3 4 5 6 7 8 9 10 11 12 13 14 15 16 17 18 19 20 21 22 public boolean isSharable () Class<?> clazz = getClass(); Map<Class<?>, Boolean> cache = InternalThreadLocalMap.get().handlerSharableCache(); Boolean sharable = cache.get(clazz); if (sharable == null ) { sharable = clazz.isAnnotationPresent(Sharable.class ) ; cache.put(clazz, sharable); } return sharable; }
这里也可以看到,netty为了性能优化到极致,还使用了ThreadLocal来缓存Handler的状态,高并发海量连接下,每次有新连接添加Handler都会创建调用此方法。
创建节点 回到主流程,看创建上下文这段代码
1 newCtx = newContext(group, filterName(name, handler), handler);
这里我们需要先分析 filterName(name, handler) 这段代码,这个函数用于给handler创建一个唯一性的名字
1
2
3
4
5
6
7
private String filterName (String name, ChannelHandler handler) if (name == null ) { return generateName(handler); } checkDuplicateName(name); return name; }
显然,我们传入的name为null,netty就给我们生成一个默认的name,否则,检查是否有重名,检查通过的话就返回
netty创建默认name的规则为 简单类名#0,下面我们来看些具体是怎么实现的
1
2
3
4
5
6
7
8
9
10
11
12
13
14
15
16
17
18
19
20
21
22
23
24
25
26
27
28
29
30
31
32
private static final FastThreadLocal<Map<Class<?>, String>> nameCaches = new FastThreadLocal<Map<Class<?>, String>>() { @Override protected Map<Class<?>, String> initialValue() throws Exception { return new WeakHashMap<Class<?>, String>(); } }; private String generateName (ChannelHandler handler) Map<Class<?>, String> cache = nameCaches.get(); Class<?> handlerType = handler.getClass(); String name = cache.get(handlerType); if (name == null ) { name = generateName0(handlerType); cache.put(handlerType, name); } if (context0(name) != null ) { String baseName = name.substring(0 , name.length() - 1 ); for (int i = 1 ;; i ++) { String newName = baseName + i; if (context0(newName) == null ) { name = newName; break ; } } } return name; }
netty使用一个 FastThreadLocal(后面的文章会细说)变量来缓存Handler的类和默认名称的映射关系,在生成name的时候,首先查看缓存中有没有生成过默认name(简单类名#0),如果没有生成,就调用generateName0()生成默认name,然后加入缓存
接下来还需要检查name是否和已有的name有冲突,调用context0(),查找pipeline里面有没有对应的context
1
2
3
4
5
6
7
8
9
10
private AbstractChannelHandlerContext context0 (String name) AbstractChannelHandlerContext context = head.next; while (context != tail) { if (context.name().equals(name)) { return context; } context = context.next; } return null ; }
context0()方法链表遍历每一个 ChannelHandlerContext,只要发现某个context的名字与待添加的name相同,就返回该context,最后抛出异常,可以看到,这个其实是一个线性搜索的过程
如果context0(name) != null 成立,说明现有的context里面已经有了一个默认name,那么就从 简单类名#1 往上一直找,直到找到一个唯一的name,比如简单类名#3
如果用户代码在添加Handler的时候指定了一个name,那么要做到事仅仅为检查一下是否有重复
1
2
3
4
5
private void checkDuplicateName (String name) if (context0(name) != null ) { throw new IllegalArgumentException("Duplicate handler name: " + name); } }
处理完name之后,就进入到创建context的过程,由前面的调用链得知,group为null,因此childExecutor(group)也返回null
DefaultChannelPipeline
1
2
3
4
5
6
7
8
9
10
private AbstractChannelHandlerContext newContext (EventExecutorGroup group, String name, ChannelHandler handler) return new DefaultChannelHandlerContext(this , childExecutor(group), name, handler); } private EventExecutor childExecutor (EventExecutorGroup group) if (group == null ) { return null ; } }
DefaultChannelHandlerContext
1
2
3
4
5
6
7
8
DefaultChannelHandlerContext( DefaultChannelPipeline pipeline, EventExecutor executor, String name, ChannelHandler handler) { super (pipeline, executor, name, isInbound(handler), isOutbound(handler)); if (handler == null ) { throw new NullPointerException("handler" ); } this .handler = handler; }
构造函数中,DefaultChannelHandlerContext将参数回传到父类,保存Handler的引用,进入到其父类
AbstractChannelHandlerContext
1
2
3
4
5
6
7
8
AbstractChannelHandlerContext(DefaultChannelPipeline pipeline, EventExecutor executor, String name, boolean inbound, boolean outbound) { this .name = ObjectUtil.checkNotNull(name, "name" ); this .pipeline = pipeline; this .executor = executor; this .inbound = inbound; this .outbound = outbound; }
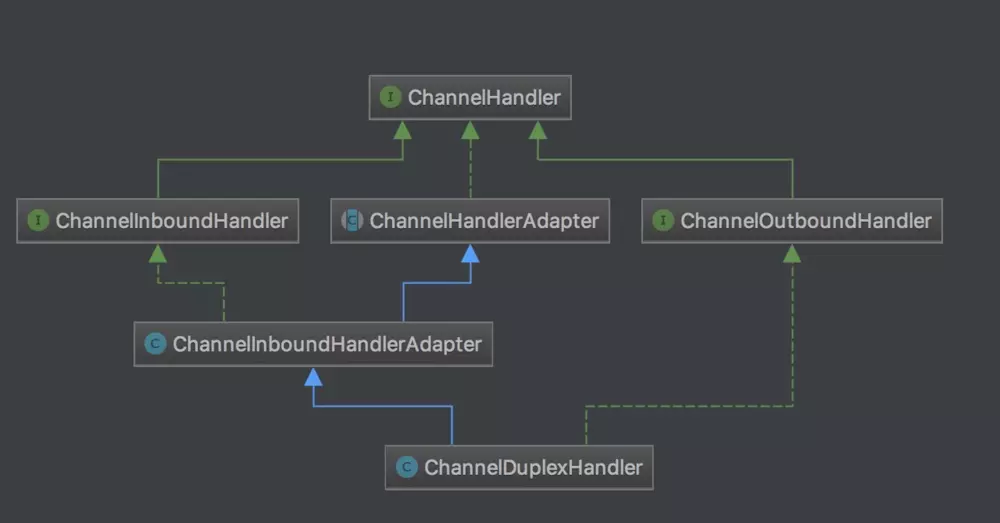
netty中用两个字段来表示这个channelHandlerContext属于inBound还是outBound,或者两者都是,两个boolean是通过下面两个小函数来判断(见上面一段代码)
DefaultChannelHandlerContext
1
2
3
4
5
6
7
private static boolean isInbound (ChannelHandler handler) return handler instanceof ChannelInboundHandler; } private static boolean isOutbound (ChannelHandler handler) return handler instanceof ChannelOutboundHandler; }
通过instanceof关键字根据接口类型来判断,因此,如果一个Handler实现了两类接口,那么他既是一个inBound类型的Handler,又是一个outBound类型的Handler,比如下面这个类
常用的,将decode操作和encode操作合并到一起的codec,一般会继承 MessageToMessageCodec,而MessageToMessageCodec就是继承ChannelDuplexHandler
MessageToMessageCodec
1
2
3
4
5
6
7
8
public abstract class MessageToMessageCodec <INBOUND_IN , OUTBOUND_IN > extends ChannelDuplexHandler protected abstract void encode (ChannelHandlerContext ctx, OUTBOUND_IN msg, List<Object> out) throws Exception ; protected abstract void decode (ChannelHandlerContext ctx, INBOUND_IN msg, List<Object> out) throws Exception ; }
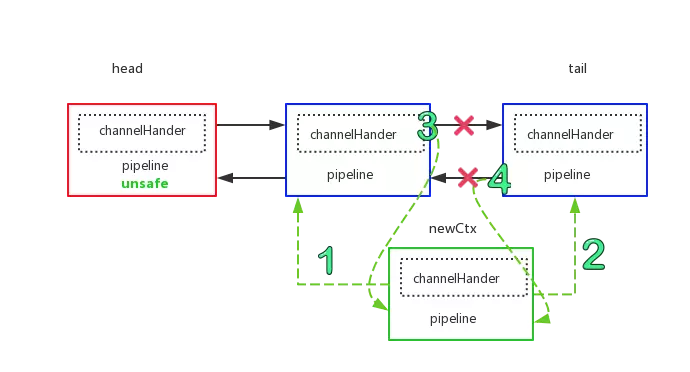
context 创建完了之后,接下来终于要将创建完毕的context加入到pipeline中去了
添加节点 1 2 3 4 5 6 7 private void addLast0 (AbstractChannelHandlerContext newCtx) AbstractChannelHandlerContext prev = tail.prev; newCtx.prev = prev; newCtx.next = tail; prev.next = newCtx; tail.prev = newCtx; }
用下面这幅图可见简单的表示这段过程,说白了,其实就是一个双向链表的插入操作
操作完毕,该context就加入到pipeline中
到这里,pipeline添加节点的操作就完成了,你可以根据此思路掌握所有的addxxx()系列方法
回调用户方法 AbstractChannelHandlerContext
1 2 3 4 private void callHandlerAdded0 (final AbstractChannelHandlerContext ctx) ctx.handler().handlerAdded(ctx); ctx.setAddComplete(); }
到了第四步,pipeline中的新节点添加完成,于是便开始回调用户代码 ctx.handler().handlerAdded(ctx);,常见的用户代码如下
AbstractChannelHandlerContext
1 2 3 4 5 6 7 public class DemoHandler extends SimpleChannelInboundHandler <...> @Override public void handlerAdded (ChannelHandlerContext ctx) throws Exception } }
接下来,设置该节点的状态
AbstractChannelHandlerContext
1 2 3 4 5 6 7 8 final void setAddComplete () for (;;) { int oldState = handlerState; if (oldState == REMOVE_COMPLETE || HANDLER_STATE_UPDATER.compareAndSet(this , oldState, ADD_COMPLETE)) { return ; } } }
用cas修改节点的状态至:REMOVE_COMPLETE(说明该节点已经被移除) 或者 ADD_COMPLETE。
pipline删除节点 netty 有个最大的特性之一就是Handler可插拔,做到动态编织pipeline,比如在首次建立连接的时候,需要通过进行权限认证,在认证通过之后,就可以将此context移除,下次pipeline在传播事件的时候就就不会调用到权限认证处理器
下面是权限认证Handler最简单的实现,第一个数据包传来的是认证信息,如果校验通过,就删除此Handler,否则,直接关闭连接
1 2 3 4 5 6 7 8 9 10 11 12 13 14 public class AuthHandler extends SimpleChannelInboundHandler <ByteBuf > @Override protected void channelRead0 (ChannelHandlerContext ctx, ByteBuf data) throws Exception if (verify(authDataPacket)) { ctx.pipeline().remove(this ); } else { ctx.close(); } } private boolean verify (ByteBuf byteBuf) } }
重点就在 ctx.pipeline().remove(this) 这段代码
1 2 3 4 5 6 @Override public final ChannelPipeline remove (ChannelHandler handler) remove(getContextOrDie(handler)); return this ; }
remove操作相比add简单不少,分为三个步骤:
1.找到待删除的节点
找到待删除的节点 DefaultChannelPipeline
1 2 3 4 5 6 7 8 9 10 11 12 13 14 15 16 17 18 19 20 21 22 23 24 25 26 27 28 29 private AbstractChannelHandlerContext getContextOrDie (ChannelHandler handler) AbstractChannelHandlerContext ctx = (AbstractChannelHandlerContext) context(handler); if (ctx == null ) { throw new NoSuchElementException(handler.getClass().getName()); } else { return ctx; } } @Override public final ChannelHandlerContext context (ChannelHandler handler) if (handler == null ) { throw new NullPointerException("handler" ); } AbstractChannelHandlerContext ctx = head.next; for (;;) { if (ctx == null ) { return null ; } if (ctx.handler() == handler) { return ctx; } ctx = ctx.next; } }
这里为了找到Handler对应的context,照样是通过依次遍历双向链表的方式,直到某一个context的Handler和当前Handler相同,便找到了该节点
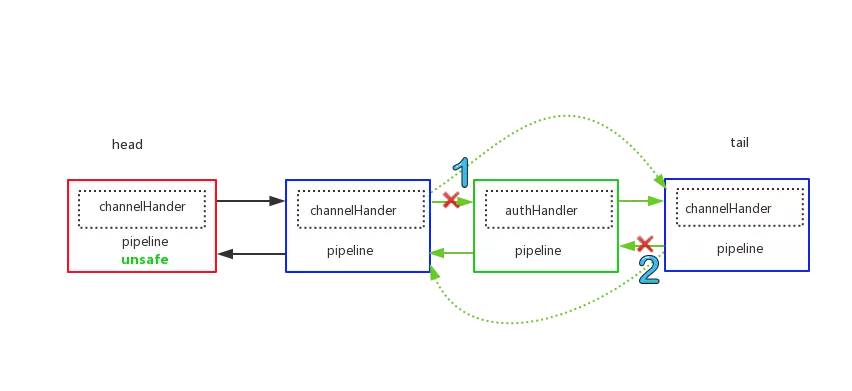
调整双向链表指针删除 DefaultChannelPipeline
1 2 3 4 5 6 7 8 9 10 11 12 13 14 15 16 17 18 private AbstractChannelHandlerContext remove (final AbstractChannelHandlerContext ctx) assert ctx != head && ctx != tail; synchronized (this ) { remove0(ctx); } callHandlerRemoved0(ctx); return ctx; } private static void remove0 (AbstractChannelHandlerContext ctx) AbstractChannelHandlerContext prev = ctx.prev; AbstractChannelHandlerContext next = ctx.next; prev.next = next; next.prev = prev; }
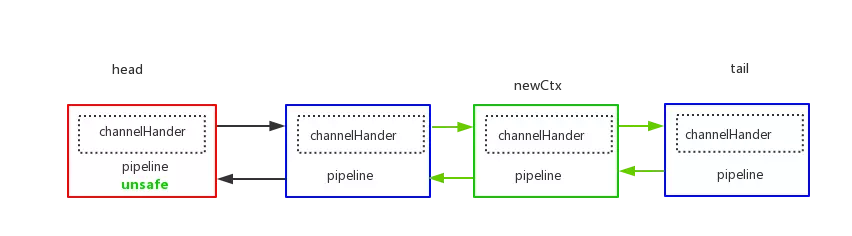
经历的过程要比添加节点要简单,可以用下面一幅图来表示
最后的结果为
结合这两幅图,可以很清晰地了解权限验证Handler的工作原理,另外,被删除的节点因为没有对象引用到,果过段时间就会被gc自动回收
回调用户函数 1 2 3 4 5 6 7 private void callHandlerRemoved0 (final AbstractChannelHandlerContext ctx) try { ctx.handler().handlerRemoved(ctx); } finally { ctx.setRemoved(); } }
到了第三步,pipeline中的节点删除完成,于是便开始回调用户代码 ctx.handler().handlerRemoved(ctx);,常见的代码如下
AbstractChannelHandlerContext
1 2 3 4 5 6 7 public class DemoHandler extends SimpleChannelInboundHandler <...> @Override public void handlerRemoved (ChannelHandlerContext ctx) throws Exception } }
最后,将该节点的状态设置为removed
1
2
3
final void setRemoved () handlerState = REMOVE_COMPLETE; }
removexxx系列的其他方法族大同小异,你可以根据上面的思路展开其他的系列方法,这里不再赘述
总结 1.以新连接创建 为例,新连接创建的过程中创建channel,而在创建channel的过程中创建了该channel对应的pipeline,创建完pipeline之后,自动给该pipeline添加了两个节点,即ChannelHandlerContext,ChannelHandlerContext中有用pipeline和channel所有的上下文信息。
2.pipeline是双向个链表结构,添加和删除节点均只需要调整链表结构
3.pipeline中的每个节点包着具体的处理器ChannelHandler,节点根据ChannelHandler的类型是ChannelInboundHandler还是ChannelOutboundHandler来判断该节点属于in还是out或者两者都是
Reference